Create a stunning pleated maxi (or mini) dress in any size with this easy-to-follow tutorial. Today, I’m refreshing the very first sewing tutorial I ever wrote—the DIY pleated dress. This project holds a special place in my heart, having crafted it before the days of Pinterest, and it’s one of my favorite creations!
I wore my original white version to Tater’s preschool graduation over a decade ago and made a newer blue version this summer for a destination wedding.
This dress flatters all body types and is simple to sew, relying on a big rectangle shape enhanced by pleats and a bit of math. Below, you’ll find a video overview of the sewing process, along with a link to watch it on YouTube.
Measurements to Take
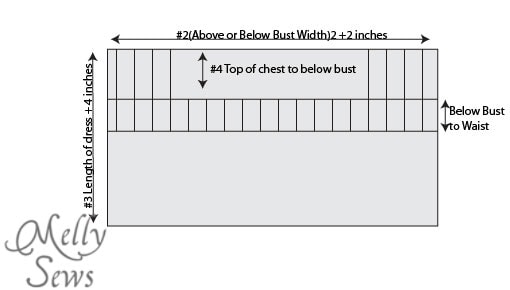
Start by measuring above and below your bust. For the measurement below your bust, double it and add 2 inches for seams and ease. For instance, if it measures 27 inches, that’s 27 x 2 = 54 + 2 = 56 inches. Next, measure from where you want the dress top to begin to where you want it to end, adding 4 inches for hems and potential measuring errors. Also, measure from the top of the dress to below the bust and from that point to your waist. Lastly, you’ll need your bust measurement across the fullest part of your chest.
To summarize, here are your measurements:
- Above bust + 2 inches (for later reference)
- Below bust x 2 + 2 inches
- Dress length + 4 inches
- From top of dress to below bust
- From below bust to waist
- Bust measurement
Materials and Tools Needed
Calculate your yardage based on your size. Here are the essential supplies:
- Fabric: You have plenty of options! My white dress is made from quilting cotton, while my blue one is polyester crepe, offering more drape. You’ll need panels according to measurement 3 for length and measurement 2 for width. If you’re on the smaller side, one piece might suffice; otherwise, consider sewing two or three pieces together. I recommend three to avoid a seam at the center front. Your panels should be half of measurement 2 for the front and two panels that are a quarter of measurement 2 for the back.
- Binding: This can be bias tape or cut on the cross or straight grain. For my blue dress, I used velvet ribbon.
- Straps: These can be fabric, bias tape sewn closed, or ribbon. Determine your length based on your style; bow-tied straps will require more material.
- General sewing supplies: Sewing machine, iron, marking tool, ruler, scissors, needle, pins, thread.
Creating the Waist and Back Pleats
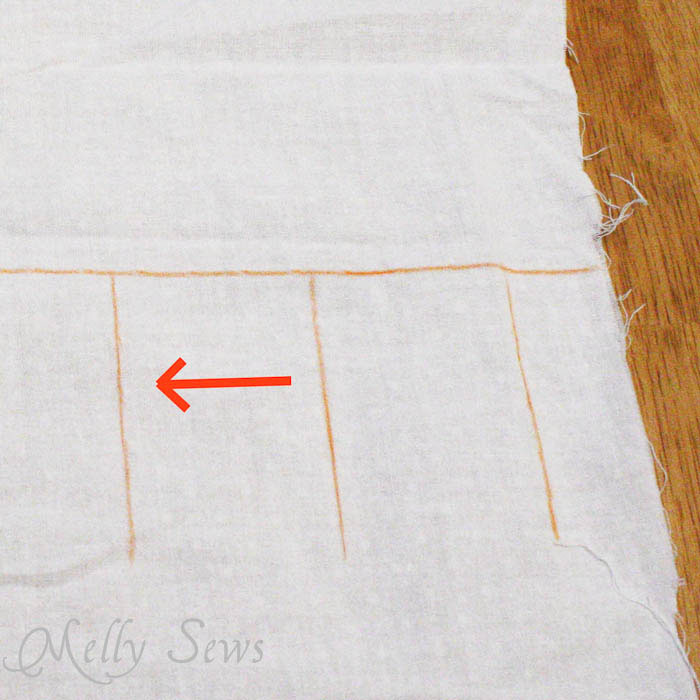
Cut out a rectangle using measurements #2 and #3. From the top edge, measure down using measurement #4 and draw a horizontal line across the fabric; this indicates where your waist pleats will end in front. Starting from that line, one inch in from the edge, draw vertical lines the length of #5 every 2 inches across the rectangle. These will form your pleats.
For example, if measurement #6 is 16 inches, you’ll need to remove 16 inches total for pleats (8 inches from each side). For the remaining pleats, only sew up to the horizontal line to allow for more room.
Sew along the lines, backtacking at the start and end of each pleat. After sewing, press the pleats flat.


Pleating Above the Bust
Next, we need to determine how much to reduce the circumference at the top edge of the dress, which involves a bit more math. For example, if measurement #1 is 32 and measurement #2 is 56, having removed 16 inches from previous pleats means you currently have 40 inches across the top.
You need to reduce 8 inches with 5 remaining pleats, so each must take out 1.6 inches. Mark the center of the last five pleats and draw lines .8 inches to either side for sewing the top pleats, going down 1/2 to 2 inches from the top edge.


Add a Zipper, Binding, Straps, and Hem
Now, fold the dress in half with the raw vertical edges aligned. Mark 1 to 1.5 inches down from the top edge on the vertical raw edges. To be more precise, tie a level string around your body above the bust, measure down to just above your bra strap, and cut to that mark.

Draw a diagonal line from the front to the mark on the center back and cut along this line for a uniform shape.
Next, insert your zipper. An 18-inch zipper works well, but you can use a slightly shorter or longer one. You might also opt for an invisible zipper for a different look.
Now it’s time to bind the top. Cut a fabric strip equal to measurement #1 and 2 inches wide, or use 1/2 inch double-fold bias tape. Fold it in half lengthwise and stitch the ends with 1/2 inch seam allowances. Pin one long edge to the top of the fabric, right sides together, and stitch.
Fold the band to the inside, tucking under the raw edge to cover the seam. Stitch in the ditch on the front side to secure.
Try on the dress and measure for straps. I made mine 17 inches long and 3 inches wide, sewing them into tubes and turning them right side out. Pin them in place to cover your bra straps and sew them securely.
Finally, hem the dress and sew a hook above the zipper. Congratulations, you’re done! Enjoy your beautiful DIY pleated dress!